
Installing and Configuring - Epson Port Emulation Software In Windows & CCLIX
In order to get Epson USB Printers to work with CCLIX receipt printing, the Epson Virtual Port Driver needs to be installed.
- Before installing the port emulator, make sure the Epson printer drivers are all installed and the Epson is connected and turned on.
- The Epson TM-Series Virtual Port Driver installer can be found at \Drivers\Printers\Epson\tmvirtualportdriver830b on both the F: drive on site and under Operations Software.

- Launch the installer and follow the standard prompts for installation until you come to the port assignment screen.
- Scroll down until you see LPT1 and click to highlight it.
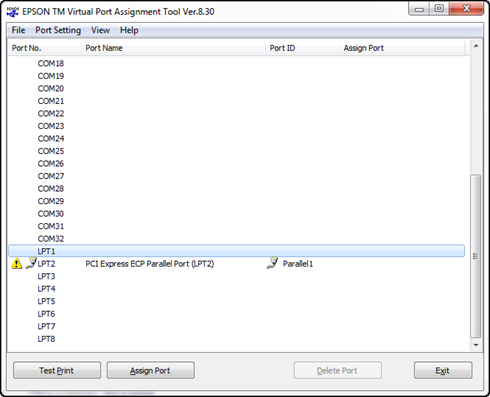
- If there is a device on LPT1 already, it will show as it does on LPT2 in this example. You will need to open device manager and assign that device to a different LPT port.
- Click on “Assign Port” at the bottom. A new window titled “LPT1” will be displayed.
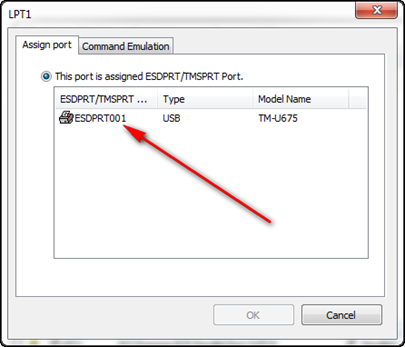
- Select the item in the list that corresponds to the Epson USB printer (the current model is the TM-U675 as shown on the right. Once selected, click on “OK”.
- Scroll back down to LPT1, and you should now see the Epson printer mapped as LPT1.

- If you click on this port again, the “Test Print” button at the bottom should no longer be greyed out. Click on the “Test Print” button to send a test message to the Epson Printer.
- If the printer is connected, drivers installed and turned on; you should get a message indicating the Epson virtual printer port, device type and LPT1 port.
- If not, check the connection settings, drivers and finally port emulation to ensure it is mapped to LPT1.
- Finally click Exit.
Testing On the Workstation and Configuring to print from CCLIX
Testing the printer for basic connectivity from the computer can be done through the command line. Open a cmd window and type, echo Hello >lpt1 and hit Enter. This should send the text ‘Hello’ to the printer. Use the up arrow & Enter to repeat the command.
- When you first install an Epson printer, an issue arises when printing receipts from CCLIX. In order for the printer to work in CCLIX, the cclix.ini should include the line, “PASS THRU PORT=LPT1”. (searching for the text “thru” should return this line as a unique result). Sometimes it will say “PASS THRU PORT=No”, and other times it will be commented out with a semicolon ‘ ; ’ at the beginning of the line. Change the line accordingly, then save and close the .ini’s.
- A best practice to follow will be to add this printer to the Windows printers as an LPT1 à Generic à Text Only, printer. Name the printer something like, “Epson LPT”.
- Once the .ini’s are configured, go into CCLIX and try to reprint a cash receipt. You do not have to specifically have to select a printer under “Receipt Printer Name” in the control file, but if the receipt fails to print, add it in there.
The printer should not be set up and working in CCLIX. If it is not functioning, use the above initial testing steps to try to print from command line, or to a test print from the Windows Generic Text only printer you configured under Devices and Printers. If these test prints fail, go back through this set of instructions making sure the Epson was installed before the Port Emulation software was set up, and make sure it is showing as LPT1.
Comments
0 comments
Please sign in to leave a comment.