
Backing Up User Profiles
In order to ensure we have the most current user profile data, we will back up the workstation user profile to the new workstation while it is in staging, or once we are on site.
*NOTE – This is not necessary on the Public workstations.
Process
First check the name of the workstation you are copying data from. The sticker is not always accurate. Press the “Windows” key and “Pause” key at the same time to bring up the system properties window. In this window will be listed the computername.

This will be the folder that you will find on F: in which to copy the user profile data.
Open File Explorer and navigate to C:\Users\. Under the Users folder, you will find a list of user profiles. We want to back up the “deputy” profile, however there may be many instances of this. You may see:
deputy
deputy.warrenclerk
deputy.warrenclerk.000
You want to back up the user profile that is the most recent. To figure this out, open a command prompt and type “set username”, then hit enter. This will return the current username. This will be the profile you back up.

Open this directory. There will be certain folders we will back up. DO NOT BACK UP THE ENTIRE PROFILE DIRECTORY! This will copy a lot of unnecessary data and take an extremely long time. We want to back up the following folders:
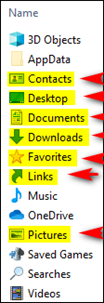
*Note: “Pictures” will only need backed up if there are actually pictures in the directory.
*Note: The cclix.ini and avis.ini under C:\Windows\ will also need copied. Just put these in the root of the named folder for the computer.
*Note: Another best practice is to also check if the C:\AVISFTP folder exists and also copy it to the root of the folder.
Highlight all the above folders using ctrl+leftclick, then right click and select ‘Copy’.
Now navigate to the “F:\Profiles” direcetory (on site), or use Splashtop file transfer to connect to \Operations\Staging\%countyname%. In that folder create a folder with the name of the workstation. Open that folder. Now right-click in a blank spot on in the folder, and select “Paste”. When the copy process prompts, click on “Overwrite All”. Do this for files and folders.
- (Backing up on-site) Once all profiles are copied, an Ops tech can do a final data sync to the external drive attached to the server, and teardown of the workstations can begin.
- Once the new workstations are installed, they can be powered on, but SHOULD NOT be logged in until the new servers are online.
- Login and testing can begin once Ops has given the go-ahead.
After Ops has confirmed the data has been synced from the old server, copying of the profile data back to the workstations can begin. This process will be the reverse of the above, copying the data from the “ Profile Backups” folder, back into the user profile folder on the workstation. Remember to be logged in as domain\deputy.
*The above step is not necessary if the profiles were copied when the workstations were in staging.
Comments
0 comments
Please sign in to leave a comment.